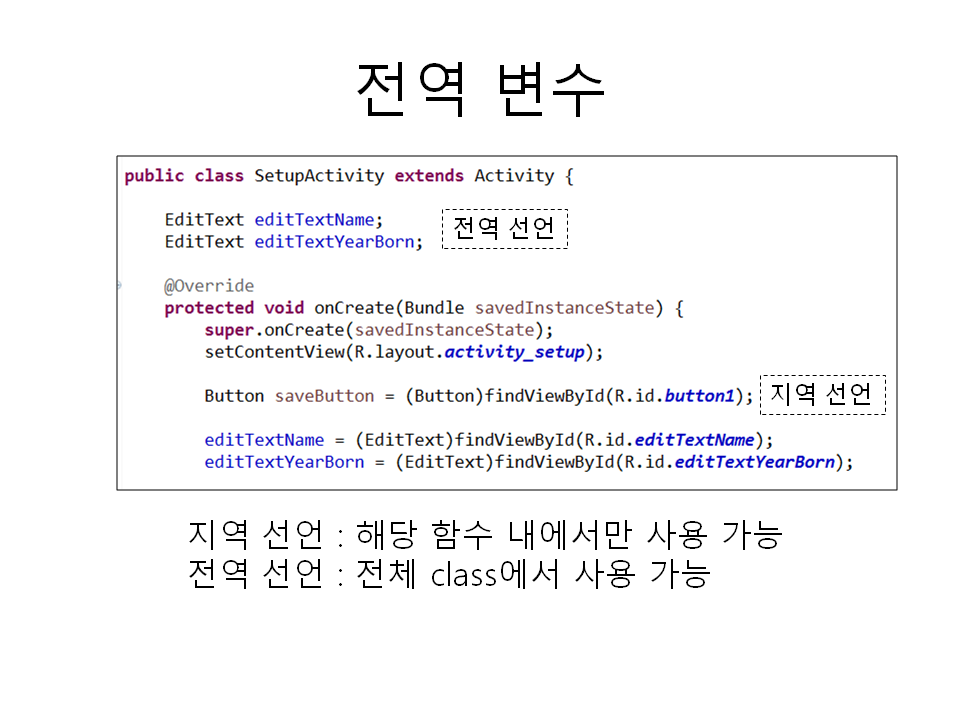
2015년 8월 29일 토요일

Java를 통한 변수, 함수 연습


public class Main {

 public int add(int arg1, int arg2) {
  return arg1 + arg2;
 }
 
 public static void main(String[] args) {

  int var1 = 3;
  int var2 = 4;
  
  Main main = new Main();
  
  int var3 = main.add(var1, var2);
  
  System.out.println(var3);
 }
}


  • 변수는 메모리에 공간을 잡고 값을 기록, "값type 이름 = 값" 
    • int a = 3;
    • double b = 4.1
    • String c = "hey";
  •  함수는 일정량의 코드를 묶어놓은 것. 호출하면 묶어놓은 코드가 수행이 됨. 
    •  호출할때, 값을 넘겨줘서 함수에서 사용가능. 
    •  함수의 결과물 return 값을 호출한 부분에서 받을 수 있음.

Java를 통한 클래스&List 연습

1.  new-java project

2. src 우클릭 new -> class
 
   Item class
   Main class

   2개를 생성

3. 각 클래스 파일에 다음을 copy

Item.class

public class Item {
 int number;
 String name;
 
 public int getNumber() {
  return number;
 }
 public void setNumber(int number) {
  this.number = number;
 }
 public String getName() {
  return name;
 }
 public void setName(String name) {
  this.name = name;
 }
}

Main.class


import java.util.ArrayList;
import java.util.List;

public class Main {

 public static void main(String[] args) {

  List<Item> listOfItems = new ArrayList<Item>();
  
  Item item1 = new Item();
  item1.setNumber(0);;
  item1.setName("item1");
  listOfItems.add(item1);

  Item item2 = new Item();
  item2.setNumber(1);;
  item2.setName("item2");
  listOfItems.add(item2);
  
  for (Item item : listOfItems) {
      System.out.println(item.getNumber() + " " + item.getName());
  }
 }
}

WebView 사용 예 (JavaScript <> Android 연동), 이미지 다운로드 기능

1. Activity의 Layout 정의
WebView를 배치


<?xml version="1.0" encoding="utf-8"?>
<RelativeLayout xmlns:android="http://schemas.android.com/apk/res/android"
    android:layout_width="match_parent"
    android:layout_height="match_parent"
    android:textAlignment="center" >

    <LinearLayout
        android:id="@+id/adSpace"
        android:layout_width="match_parent"
        android:layout_height="wrap_content"
        android:layout_alignParentBottom="true"
        android:gravity="bottom"
        android:orientation="horizontal" />

    <LinearLayout
        android:id="@+id/btnSpace"
        android:layout_width="match_parent"
        android:layout_height="wrap_content"
        android:layout_above="@+id/adSpace"
        android:gravity="bottom"
        android:orientation="horizontal" >

        <Button
            android:id="@+id/btn"
            android:layout_width="match_parent"
            android:layout_height="wrap_content"
            android:text="Hey"
            android:gravity="bottom"
            android:orientation="horizontal" >
        </Button>
    </LinearLayout>

    <WebView
        android:id="@+id/webView1"
        android:layout_width="match_parent"
        android:layout_height="match_parent"
        android:layout_above="@+id/btnSpace"
        android:layout_centerHorizontal="true"
        android:layout_marginBottom="1dp" />

</RelativeLayout>


2. Activity Java 파일 작성

public class JavaScriptActivity extends Activity {

 //전역으로 WebView 타입의  변수 선언
 private WebView webView;

 @Override 
 public void onCreate(Bundle savedInstanceState) {
  super.onCreate(savedInstanceState);
  requestWindowFeature(Window.FEATURE_NO_TITLE);
  setContentView(R.layout.web_view_activity);

  //다른 Activity에서 넘겨준 데이터 가져오기.WebView에 load할 url
  String url = getIntent().getStringExtra("url");

  //Layout에서 WebView가져오기
  webView = (WebView)findViewById(R.id.webView1);
  
  //다양한 WebView 설정들
  WebSettings settings = webView.getSettings();
  settings.setJavaScriptEnabled(true);
  settings.setSaveFormData(false);
  //settings.setSupportZoom(true);
  //settings.setBuiltInZoomControls(true);

  //JavaScript와 AndroidNative와의 연결고리 설정
  webView.addJavascriptInterface(new JavaScriptInterface(this), "Android");
  webView.setWebChromeClient(new ChromeClient());

  //asset에 있는 url을 webview에서 오픈한다.
  String resourceURI = "file:///android_asset/1.html";
  
  if (!url.isEmpty()) {
   resourceURI = "file:///android_asset/"+url;
  }
  
  webView.loadUrl(resourceURI);

  //안드로이드의 버튼을 클릭하면 html문서 상의 javascript함수를 호출하는 예제.
  Button btn = (Button)findViewById(R.id.btn);
  btn.setOnClickListener(new OnClickListener() {
   @Override
   public void onClick(View v) {
    webView.loadUrl("javascript:setText('change text')");
   }
  });
 }

 
 @Override 
 public void onBackPressed () {
  //뒤로 가기 버튼을 클릭했을 시, 브라우저 history상 이전 페이지로 가도록 
  if (webView.canGoBack()) {
   webView.goBack();
  }
  else
   super.onBackPressed();
 }
 
 //asset에 있는 파일을 사용자의 sdcard에 저장하는 함수
 public void saveFileFromAsset(String filePathInAsset, String targetPathInSDCard) {
  AssetManager assetManager = getAssets();

  InputStream in = null;
  OutputStream out = null;
  try {
   in = assetManager.open(filePathInAsset);   // if files resides inside the "Files" directory itself
   out = new FileOutputStream(Environment.getExternalStorageDirectory().toString() + targetPathInSDCard + filePathInAsset);
   copyFile(in, out);
   in.close();
   in = null;
   out.flush();
   out.close();
   out = null;
   
   
   //sd카드에 파일을 쓴 후, 시스템에 알려줘야 한다. 
   final String outputPath = Environment.getExternalStorageDirectory().toString() + targetPathInSDCard + filePathInAsset;

   MediaScannerConnection.scanFile(JavaScriptActivity.this, 
     new String[] { outputPath.toString() }, 
     null,
     new MediaScannerConnection.OnScanCompletedListener() {
      public void onScanCompleted(String path, Uri uri) {
       Toast.makeText(getApplicationContext(), 
         "Image downloaded on \n" + outputPath, 
         Toast.LENGTH_SHORT).show();
    }
   });
  } catch(Exception e) {
   Log.e("tag", e.getMessage());
  }
 }
 
 private void copyFile(InputStream in, OutputStream out) throws IOException {
  byte[] buffer = new byte[1024];
  int read;
  while((read = in.read(buffer)) != -1){
   out.write(buffer, 0, read);
  }
 }

 public class JavaScriptInterface {    
  Context context = null;

  JavaScriptInterface(Context aContext)    {        
   context = aContext;    
  }

  //HTML 문서 내에서 JavaScript로 호출가능한 함수
  //브라우저에서 load가 완료되었을 때 호출하는 함수
  @JavascriptInterface
  public void onload() {
   Toast.makeText(getApplicationContext(), 
     "JavaScript onLoad", 
     Toast.LENGTH_SHORT).show();
  }

  //HTML 문서 내에서 JavaScript로 호출가능한 함수
  //asset의 파일을 로컬에 저장 
  @JavascriptInterface
  public void saveFile(String path) {
   saveFileFromAsset(path, "/Pictures/KakaoTalk/");
  }
 }

 public final class ChromeClient extends WebChromeClient {
  @Override
  public boolean onJsAlert(WebView view, String url, String message, JsResult result) {
   result.confirm();
   return true;
  }
 } 
}

3. asset에 html 파일 배치하기 (1.html)


<html>
<head>
 <script> 
 window.onload = function() {
  Android.onload();
 };

 function saveImage(filename) {
  Android.launch(filename);
 };
 
 function setText(change) {
  var textArea = document.getElementById('text');
  textArea.innerHTML = change;
 };
 </script>
</head>

<body>
 <div id ='text'>
  This is hawaii
 </div>
 
 <input id="b1"
     type="button" 
     value="Save Image" 
     onClick="saveImage('hawaii.png')" />
 
 <img id="myimg" 
      src="hawaii.png" />
   
</body>
</html>

4. androidManifest.xml에 권한 설정

<uses-permission android:name="android.permission.WRITE_EXTERNAL_STORAGE"></uses-permission>
<uses-permission android:name="android.permission.INTERNET" />
<uses-permission android:name="android.permission.READ_EXTERNAL_STORAGE" />
<uses-permission android:name="android.permission.DOWNLOAD_WITHOUT_NOTIFICATION" />

2015년 8월 7일 금요일

List View 활용하기

작업 절차
1. OneItem class 정의 
2. OneItem에 대한 xml정의(item_layout.xml) : 배치 디자인
3. ItemListAdapter 에서 getView 함수 수정
4. main_activity.xml 디자인 : ListView 삽입
5. MainActivity에서 List 데이터 생성하여 삽입

MainActivity.java

public class MainActivity extends Activity {
@Override
protected void onCreate(Bundle savedInstanceState) {
super.onCreate(savedInstanceState);
setContentView(R.layout.main_activity);
 
//ListView에 넣을 데이터의 리스트 변수 생성
List<OneItem> items =  new ArrayList<OneItem>();

{
OneItem item=  new OneItem();
item.imagefile = R.drawable.ic_launcher;
item.title = "Someone Like You";
item.singer = "Adele";
item.length = "4:47";
items.add(item);//리스트에 삽입
}

{
OneItem item=  new OneItem();
item.imagefile = R.drawable.ic_launcher;
item.title = "Stranger In Moscos";
item.singer = "Michael Jackson";
item.length = "5:44";
items.add(item);//리스트에 삽입
}

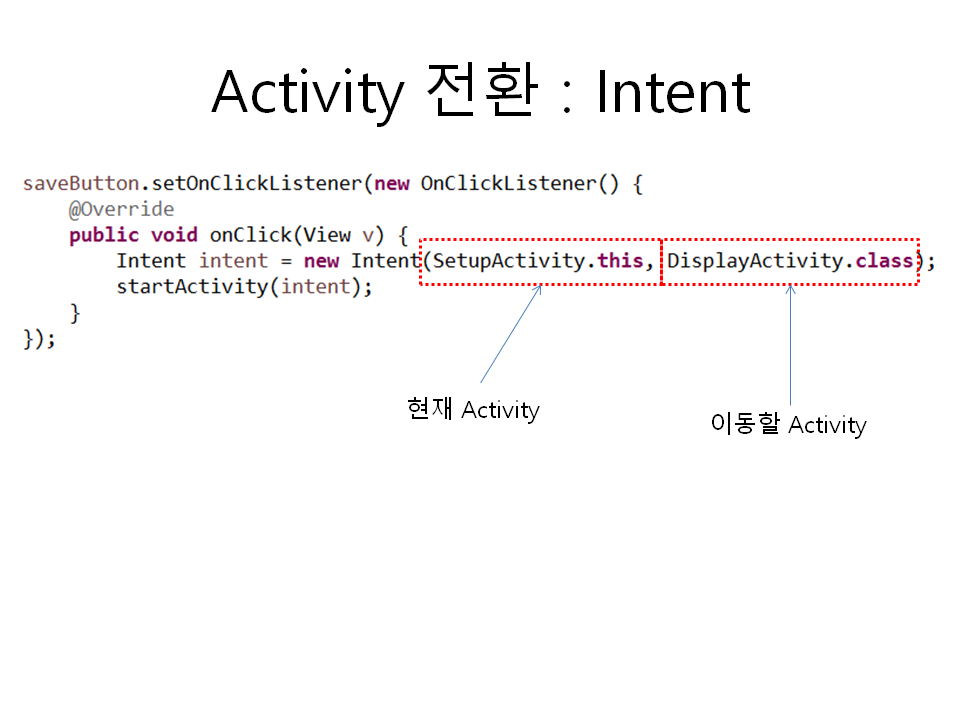
ListView listView = (ListView)findViewById(R.id.list);
ItemListAdapter adapter = new ItemListAdapter(this, R.layout.item_layout, items);
listView.setAdapter(adapter);
}

//클래스 정의
public class OneItem {
public String title;
public String singer;
public String length;
public Integer imagefile;
}

class ItemListAdapter extends ArrayAdapter<OneItem>  {
private List<OneItem> items;
private Context context;
private int layoutResource;

public void setContext(Context c) {
this.context = c;
}

public ItemListAdapter(Context context, int layoutResource, List<OneItem> items) {
super(context, layoutResource, items);
this.context = context;
this.items =  items;
this.layoutResource = layoutResource;
}

@Override      
public View getView(int position, View convertView, ViewGroup parent) {
if (convertView == null) {
LayoutInflater layoutInflater = (LayoutInflater)context.getSystemService(Context.LAYOUT_INFLATER_SERVICE);
convertView = layoutInflater.inflate(layoutResource, null);
}

final OneItem oneItem = items.get(position);

if (oneItem != null) {
    //이하의 부분을 구성
TextView title = (TextView) convertView.findViewById(R.id.title);                      
TextView singer = (TextView) convertView.findViewById(R.id.singer);                      
TextView length = (TextView) convertView.findViewById(R.id.length);                      
ImageView imgView = (ImageView) convertView.findViewById(R.id.imageView1);

if (title != null){                          
title.setText(oneItem.title);        
}                      
if (singer != null){                          
singer.setText(oneItem.singer);        
}                      
if (length != null){                          
length.setText(oneItem.length);        
}                      
if(imgView != null){
imgView.setBackgroundResource(oneItem.imagefile);
}      
}              
return convertView;      
}
}
}


main_activity.xml


<?xml version="1.0" encoding="utf-8"?>
<RelativeLayout xmlns:android="http://schemas.android.com/apk/res/android"
    android:layout_width="match_parent"
    android:layout_height="match_parent" >
    <ListView
        android:id="@+id/list"
        android:layout_width="fill_parent"
        android:layout_height="fill_parent"
    />


</RelativeLayout>


item_layout.xml

<?xml version="1.0" encoding="utf-8"?>
<RelativeLayout xmlns:android="http://schemas.android.com/apk/res/android"
    android:layout_width="match_parent"
    android:layout_height="match_parent" >

    <ImageView
        android:id="@+id/imageView1"
        android:layout_width="128dp"
        android:layout_height="128dp"
        android:layout_alignParentLeft="true"
        android:layout_centerVertical="true" />

    <TextView
        android:id="@+id/title"
        android:layout_width="wrap_content"
        android:layout_height="wrap_content"
        android:layout_alignTop="@+id/imageView1"
        android:layout_toRightOf="@+id/imageView1"
        android:text="Title" />

    <TextView
        android:id="@+id/singer"
        android:layout_width="wrap_content"
        android:layout_height="wrap_content"
        android:layout_alignLeft="@+id/title"
        android:layout_below="@+id/title"
        android:text="Singer" />

    <TextView
        android:id="@+id/length"
        android:layout_width="wrap_content"
        android:layout_height="wrap_content"
        android:layout_alignBaseline="@+id/title"
        android:layout_alignBottom="@+id/title"
        android:layout_alignParentRight="true"
        android:text="Length" />

</RelativeLayout>


GAE를 활용하여 웹 서버 구축~!

Google App Engine을 통해 웹 서버를 쉽게 만들고 운영을 해봅시다.

장점 : 1) 적은 사용량은 계속 공짜, 사용량 많아지면 그때부터 과금
         2) 쉽게 관리 가능


먼저 참고하는 사이트는 다음과 같습니다.

https://developers.google.com/eclipse/docs/download

제일 먼저 해야 될 것은 Eclipse에 Google Plugin을 설치하는 것입니다.

Google Plugin은 Android Plugin과는 별개이오니

주의하시기 바랍니다.

Eclipse에서 help -> install new software에서

Work With : Add 하여

name : https://dl.google.com/eclipse/plugin/4.4
location : https://dl.google.com/eclipse/plugin/4.4

으로 하여 install을 진행합니다.


그럼 Gae Project를 하나 생성해 보겠습니다.


File -> New 에 보면 Google이란 폴더가 생겼습니다~!
여기서 Web Application Project를 선택하세요


Project이름을 지정하시고, 
중간에 Use Google Web Toolkit 은 해제해줍니다. 

프로젝트 생성이 완료되었습니다. 
여기에 서블릿들 만들어서 웹 프로그래밍 한 다음에 
프로젝트 마우스 우클릭 -> Google -> Deply to App Engine 
하면 만든 웹 서버가 Cloud에 올라가서 실제 기동이 되기 시작합니다 (;