<RelativeLayout xmlns:android="http://schemas.android.com/apk/res/android"
xmlns:tools="http://schemas.android.com/tools"
android:layout_width="match_parent"
android:layout_height="match_parent"
tools:context="${relativePackage}.${activityClass}" >
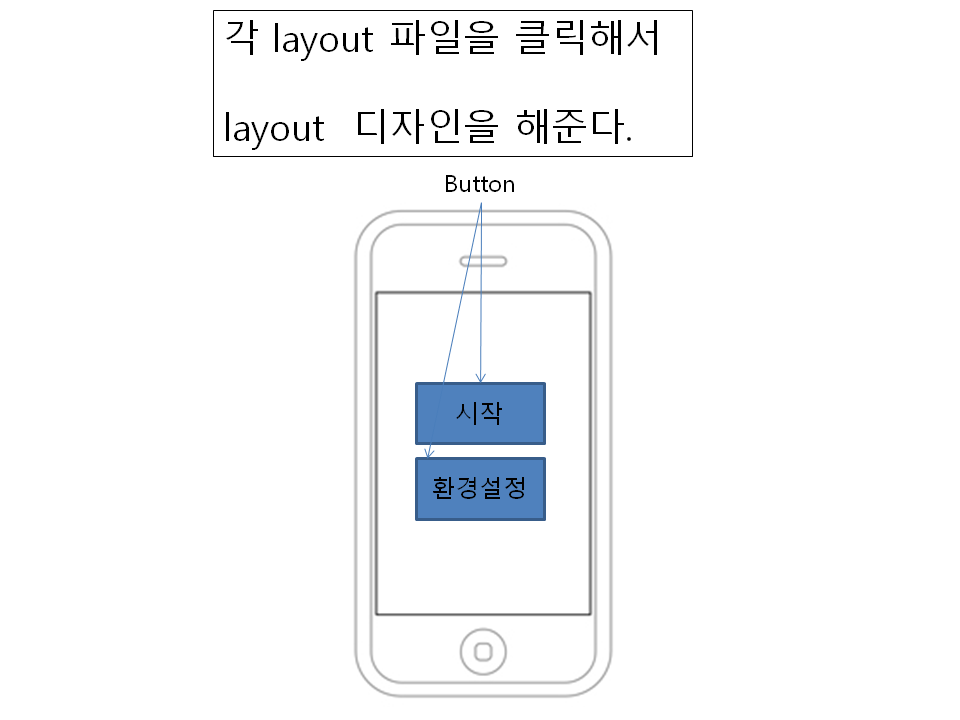
<Button
android:id="@+id/buttonStart"
android:layout_width="wrap_content"
android:layout_height="wrap_content"
android:layout_alignParentTop="true"
android:layout_centerHorizontal="true"
android:layout_marginTop="190dp"
android:text="Start" />
<Button
android:id="@+id/buttonSetup"
android:layout_width="wrap_content"
android:layout_height="wrap_content"
android:layout_alignLeft="@+id/buttonStart"
android:layout_below="@+id/buttonStart"
android:layout_marginTop="40dp"
android:text="Setup" />
</RelativeLayout>
activity_setup.xml
<RelativeLayout xmlns:android="http://schemas.android.com/apk/res/android"
xmlns:tools="http://schemas.android.com/tools"
android:layout_width="match_parent"
android:layout_height="match_parent"
tools:context="${relativePackage}.${activityClass}" >
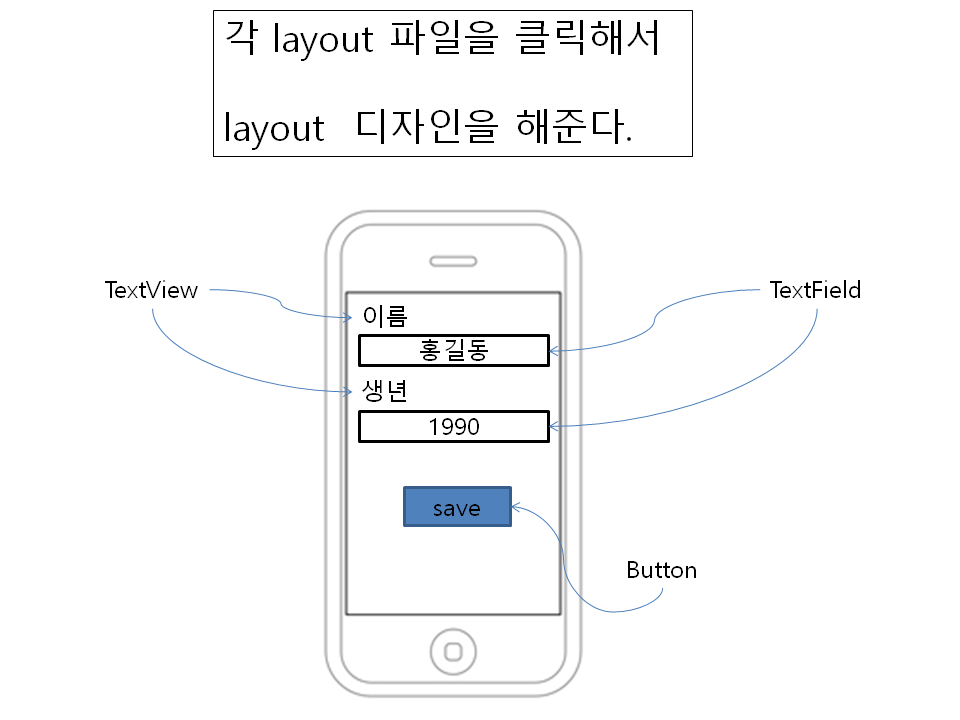
<TextView
android:id="@+id/textView1"
android:layout_width="wrap_content"
android:layout_height="wrap_content"
android:layout_alignParentLeft="true"
android:layout_alignParentTop="true"
android:text="이름" />
<EditText
android:id="@+id/editTextName"
android:layout_width="wrap_content"
android:layout_height="wrap_content"
android:layout_alignParentLeft="true"
android:layout_below="@+id/textView1"
android:ems="10"
android:inputType="textPersonName" >
</EditText>
<TextView
android:id="@+id/textView2"
android:layout_width="wrap_content"
android:layout_height="wrap_content"
android:layout_alignParentLeft="true"
android:layout_below="@+id/editTextName"
android:text="생년" />
<EditText
android:id="@+id/editTextYearBorn"
android:layout_width="wrap_content"
android:layout_height="wrap_content"
android:layout_alignParentLeft="true"
android:layout_below="@+id/textView2"
android:ems="10" >
</EditText>
<Button
android:id="@+id/button1"
android:layout_width="wrap_content"
android:layout_height="wrap_content"
android:layout_alignParentLeft="true"
android:layout_below="@+id/editTextYearBorn"
android:text="Save" />
</RelativeLayout>
xmlns:tools="http://schemas.android.com/tools"
android:layout_width="match_parent"
android:layout_height="match_parent"
tools:context="${relativePackage}.${activityClass}" >
<TextView
android:id="@+id/textView1"
android:layout_width="wrap_content"
android:layout_height="wrap_content"
android:layout_alignParentLeft="true"
android:layout_alignParentTop="true"
android:text="이름" />
<EditText
android:id="@+id/editTextName"
android:layout_width="wrap_content"
android:layout_height="wrap_content"
android:layout_alignParentLeft="true"
android:layout_below="@+id/textView1"
android:ems="10"
android:inputType="textPersonName" >
</EditText>
<TextView
android:id="@+id/textView2"
android:layout_width="wrap_content"
android:layout_height="wrap_content"
android:layout_alignParentLeft="true"
android:layout_below="@+id/editTextName"
android:text="생년" />
<EditText
android:id="@+id/editTextYearBorn"
android:layout_width="wrap_content"
android:layout_height="wrap_content"
android:layout_alignParentLeft="true"
android:layout_below="@+id/textView2"
android:ems="10" >
</EditText>
<Button
android:id="@+id/button1"
android:layout_width="wrap_content"
android:layout_height="wrap_content"
android:layout_alignParentLeft="true"
android:layout_below="@+id/editTextYearBorn"
android:text="Save" />
</RelativeLayout>
activity_display.xml
<RelativeLayout xmlns:android="http://schemas.android.com/apk/res/android"
xmlns:tools="http://schemas.android.com/tools"
android:layout_width="match_parent"
android:layout_height="match_parent"
tools:context="${relativePackage}.${activityClass}" >
<TextView
android:id="@+id/textView1"
android:layout_width="wrap_content"
android:layout_height="wrap_content"
android:layout_centerHorizontal="true"
android:layout_centerVertical="true"
android:text="Hello" />
</RelativeLayout>
MainActivity.java
package com.example.mybirthdayapp;
import android.app.Activity;
import android.content.Intent;
import android.os.Bundle;
import android.view.View;
import android.view.View.OnClickListener;
import android.widget.Button;
public class MainActivity extends Activity {
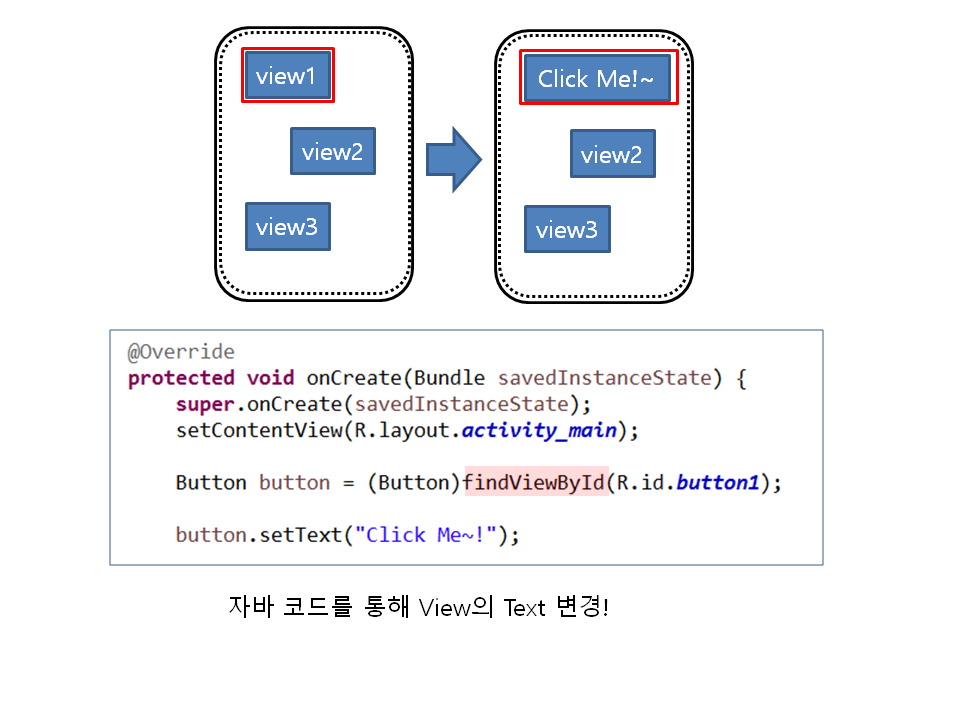
@Override
protected void onCreate(Bundle savedInstanceState) {
super.onCreate(savedInstanceState);
setContentView(R.layout.activity_main);
Button buttonStart = (Button)findViewById(R.id.buttonStart);
buttonStart.setOnClickListener(new OnClickListener() {
@Override
public void onClick(View v) {
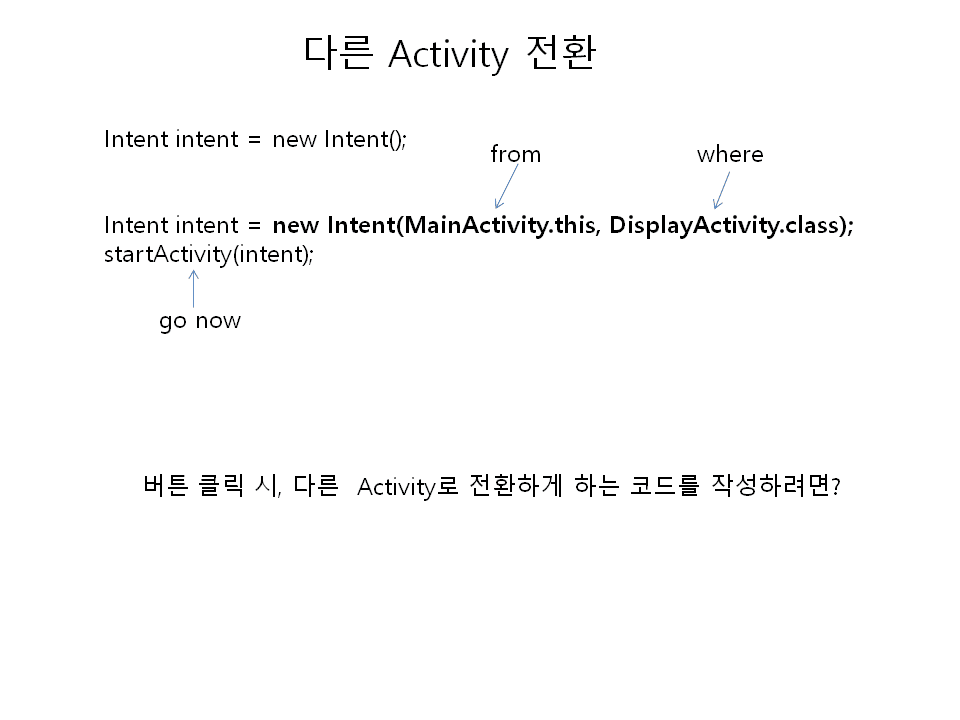
Intent intent = new Intent(MainActivity.this, DisplayActivity.class);
startActivity(intent);
}
});
Button buttonSetup = (Button)findViewById(R.id.buttonSetup);
buttonSetup.setOnClickListener(new OnClickListener() {
@Override
public void onClick(View v) {
Intent intent = new Intent(MainActivity.this, SetupActivity.class);
startActivity(intent);
}
});
}
}
import android.app.Activity;
import android.content.Intent;
import android.os.Bundle;
import android.view.View;
import android.view.View.OnClickListener;
import android.widget.Button;
public class MainActivity extends Activity {
@Override
protected void onCreate(Bundle savedInstanceState) {
super.onCreate(savedInstanceState);
setContentView(R.layout.activity_main);
Button buttonStart = (Button)findViewById(R.id.buttonStart);
buttonStart.setOnClickListener(new OnClickListener() {
@Override
public void onClick(View v) {
Intent intent = new Intent(MainActivity.this, DisplayActivity.class);
startActivity(intent);
}
});
Button buttonSetup = (Button)findViewById(R.id.buttonSetup);
buttonSetup.setOnClickListener(new OnClickListener() {
@Override
public void onClick(View v) {
Intent intent = new Intent(MainActivity.this, SetupActivity.class);
startActivity(intent);
}
});
}
}
SetupActivity.java
package com.example.mybirthdayapp;
import android.app.Activity;
import android.os.Bundle;
import android.view.Gravity;
import android.view.View;
import android.view.View.OnClickListener;
import android.widget.Button;
import android.widget.EditText;
import android.widget.Toast;
public class SetupActivity extends Activity {
EditText editTextName;
EditText editTextYearBorn;
@Override
protected void onCreate(Bundle savedInstanceState) {
super.onCreate(savedInstanceState);
setContentView(R.layout.activity_setup);
Button saveButton = (Button)findViewById(R.id.button1);
editTextName = (EditText)findViewById(R.id.editTextName);
editTextYearBorn = (EditText)findViewById(R.id.editTextYearBorn);
String name = MyUtil.getPreferenceString(getApplicationContext(), "name", "");
Integer yearBorn = MyUtil.getPreferenceInt(getApplicationContext(), "yearBorn", 1995);
editTextName.setText(name);
editTextYearBorn.setText(yearBorn+"");
saveButton.setOnClickListener(new OnClickListener() {
@Override
public void onClick(View v) {
String name = editTextName.getText().toString();
String yearBorn = editTextYearBorn.getText().toString();
MyUtil.savePreferenceString(getApplicationContext(), "name", name);
MyUtil.savePreferenceInt(getApplicationContext(), "yearBorn", Integer.valueOf(yearBorn));
Toast.makeText(getApplicationContext(), "Saved!", Toast.LENGTH_SHORT).show();
finish();
}
});
}
}
DisplayActivity.java
package com.example.mybirthdayapp;
import android.app.Activity;
import android.os.Bundle;
import android.widget.TextView;
public class DisplayActivity extends Activity {
@Override
protected void onCreate(Bundle savedInstanceState) {
super.onCreate(savedInstanceState);
setContentView(R.layout.activity_display);
TextView textView = (TextView)findViewById(R.id.textView1);
String name = MyUtil.getPreferenceString(getApplicationContext(), "name", "");
Integer yearBorn = MyUtil.getPreferenceInt(getApplicationContext(), "yearBorn", 1995);
String animal = "";
int namuji = yearBorn % 12;
if (namuji == 4) animal = "쥐띠";
else if (namuji == 5) animal = "소띠";
else if (namuji == 6) animal = "호랑이띠";
else if (namuji == 7) animal = "토끼띠";
else if (namuji == 8) animal = "용띠";
else if (namuji == 9) animal = "뱀띠";
else if (namuji == 10) animal = "말띠";
else if (namuji == 11) animal = "양띠";
else if (namuji == 0) animal = "원숭이띠";
else if (namuji == 1) animal = "닭띠";
else if (namuji == 2) animal = "개띠";
else if (namuji == 3) animal = "돼지띠";
textView.setText("Hi, "+name + " You're born in " + yearBorn + " your animal " + animal);
}
}
MyUtil.java
package com.example.mybirthdayapp;
import android.content.Context;
import android.content.SharedPreferences;
public class MyUtil {
private static final String pref_name = "appname";
private static final int pref_mode = Context.MODE_PRIVATE;
//////////////////////////////////////////////////////////////////////////
private static SharedPreferences getPref(Context context) {
return context.getSharedPreferences(pref_name, pref_mode);
}
//////////////////////////////////////////////////////////////////////////
public static void savePreferenceString(Context context, String key, String value) {
getPref(context).edit().putString(key, value).commit();
}
public static String getPreferenceString(Context context, String key, String value) {
return getPref(context).getString(key, value);
}
//////////////////////////////////////////////////////////////////////////
public static void savePreferenceInt(Context context, String key, Integer value) {
getPref(context).edit().putInt(key, value).commit();
}
public static Integer getPreferenceInt(Context context, String key, Integer value) {
return getPref(context).getInt(key, value);
}
}